DigiMe Features
This section describes how to use DigiMe for content creation and scheduling all your social media posts.
Create a Post
Here's a step-by-step guide to creating content from the DigiMe editor:
- Open the Editor: Once logged into DigiMe, navigate to the day/date when you want the post. Click on the + icon.

- Select Social Platforms: Choose the platforms where you want to publish the content (e.g., Instagram, Facebook, Twitter).

- Compose Your Post:
- Manual creation: Write your message in the text box. DigiMe allows you to tailor content for each platform with previews, ensuring it looks perfect.
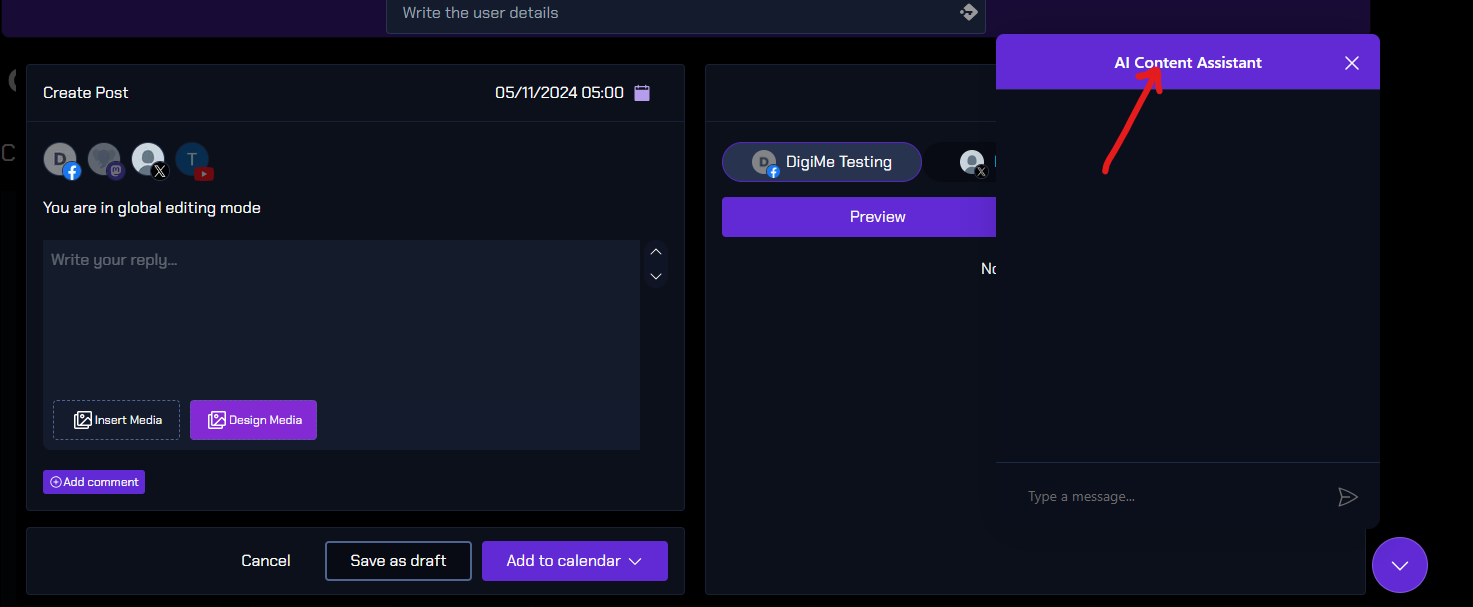
- AI Content Assistant: With the click of the pencil on the right corner of the Create a post box, you can ask the AI Assistant to create the content for your post. Just ask to create the post topic you need and it will make the content for you.


- Add Media: Upload images, videos, or GIFs by clicking the "Add Media" button. DigiMe may offer editing tools creating images and also for basic adjustments.

- Add Hashtags & Emojis: Use hashtags to increase visibility, and emojis to make the post more engaging.
- Optimize with Tags and Links: Tag relevant pages or add links as needed, depending on the platform.
- Set Publish Date & Time: Schedule your post by selecting a specific date and time, or save it as a draft for review.

- Preview and Finalize: Check how the post will appear on each platform, make any final tweaks, and hit "Schedule" or "Post Now" to publish.


With these steps, you can create and tailor content efficiently across platforms, keeping your social media presence consistent and engaging!
Schedule a post
Here are the steps to schedule posts from the DigiMe editor:
- Access the Post Editor: After logging into DigiMe, go to the “Create Post” or “Editor” section.

- Create Your Content: Compose your message, add media (images, videos), and customize hashtags, tags, or links for each platform you want to post to.

- Select Date and Time: Choose the “Schedule” option. A calendar or date-time picker will appear where you can select the exact day and time for the post.
- Preview Post: Review how your content will appear on each platform to ensure it looks right. Make any necessary edits.
- Confirm and Schedule: Click “Schedule Post” to finalize. Your post will now appear in your calendar, set to go live at the specified time.

- Post Now: Click on "Post Now" to publish your post now on the platforms you want to publish.


Following these steps will schedule your posts, making your content strategy smooth and consistent.
Track your post analytics
Here’s how to track the analytics of your posts on DigiMe:
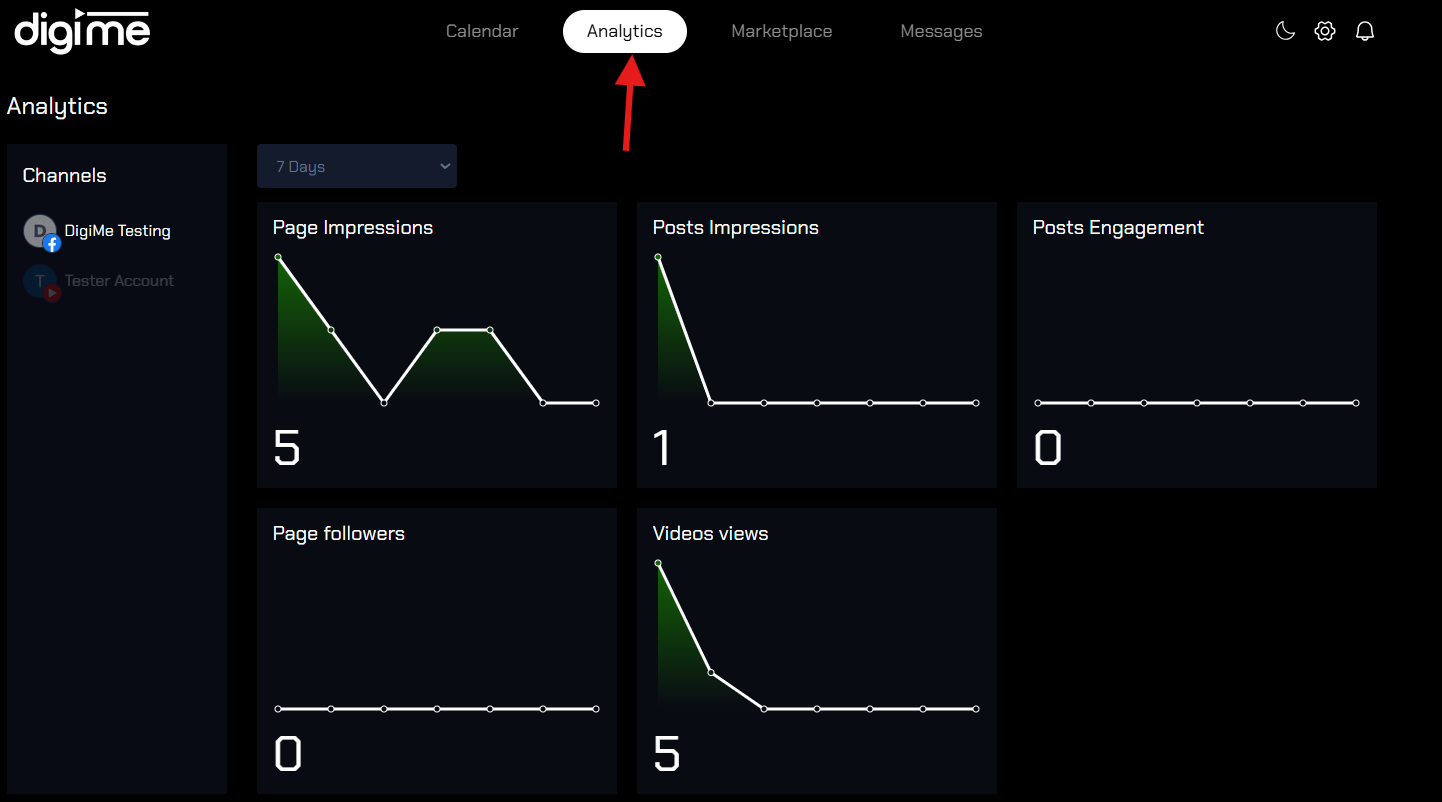
- Log into DigiMe: After logging in, go to the “Analytics” section on the dashboard, usually accessible from the main menu.

- Select Social Accounts: Choose the specific social media account or platform you want to review analytics for (e.g., Instagram, Facebook).

- Choose Date Range: Set a date range to view metrics for a specific period, such as last week, last month etc.

- View Key Metrics: DigiMe provides insights like engagement rate, likes, comments, shares, impressions, and follower growth.


Work as a team
Here’s a quick guide on inviting team members to collaborate, comment, and schedule posts in DigiMe:
-
Log in to DigiMe: After logging in, click on the settings icon in the top right corner.

-
Access Team Member Settings: In the profile settings, scroll down to the Team Members section.
-
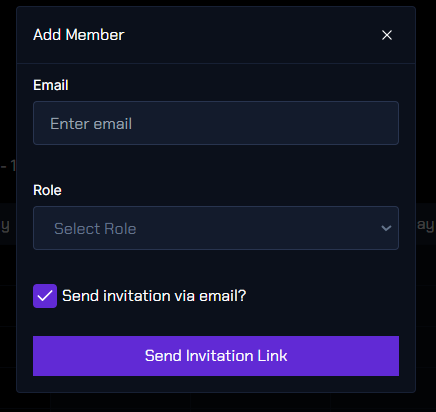
Add a Team Member: Select Add Another Member, enter the member's details such as their email and role, and send them the invitation link.

-
Impersonating a User: As an organization admin, to post on behalf of another user, select their details from the list of users in your organization. This will switch you to impersonating mode, allowing you to create and post content as that user.


Additional Features
- Notifications :
Here’s how to access notifications in DigiMe:
-
Go to the Dashboard: Once on the dashboard, look for the bell icon in the top right corner.

-
View Notifications: Clicking on the bell icon will display a list of recent notifications, including links to posts that have been published on various platforms.
This allows you to easily keep track of published content and stay updated!
-
- Light Dark theme options:
- Go to the Dashboard: Once on the dashboard, look for the sun and moon icon in the top right corner.
- Light Theme(Sun icon): Enjoy a clean, bright interface designed for easy readability and a refreshing user experience in well-lit environments.

- Dark Theme(moon icon): Switch to a sleek, darker interface that's easy on the eyes, perfect for low-light conditions and reducing screen glare.
- Light Theme(Sun icon): Enjoy a clean, bright interface designed for easy readability and a refreshing user experience in well-lit environments.
- Go to the Dashboard: Once on the dashboard, look for the sun and moon icon in the top right corner.

